
Adjusting a pressure switch on an air compressor may sound technical, but with the right guidance, anyone can do it safely and effectively. The pressure switch is a key part that controls when your air compressor turns on and off.
If it is set incorrectly, your compressor could run too often or not enough, wasting energy or failing to provide enough air. Learning how to adjust it can help you get more reliable performance, save money, and even extend the life of your machine.
This guide will walk you through the complete process, including safety tips, step-by-step instructions, common mistakes, and expert advice to make sure you get the best results.
What Is A Pressure Switch And Why Does It Matter?
The pressure switch is a simple yet powerful device. It tells the air compressor when to start (cut-in pressure) and when to stop (cut-out pressure). When the air in the tank drops below a certain point, the switch turns the compressor on. When the tank reaches the top pressure limit, the switch shuts the compressor off. This cycle keeps your air supply steady and prevents damage to the machine.
If your pressure switch is not set correctly, you could face problems like:
- Compressor running non-stop (wasting energy)
- Not enough air for your tools or equipment
- Too much pressure, risking tank or hose damage
- Compressor not starting when needed
Adjusting the pressure switch helps you get the right air pressure for your tools, improve efficiency, and reduce wear and tear.
Basic Safety Precautions Before You Start
Working with air compressors involves high pressure and electricity. Before you touch anything, always follow these basic steps:
- Turn off the compressor and unplug it from the power source.
- Release all air pressure from the tank by opening the drain valve or using the air outlet.
- Wait for the compressor to cool if it was running recently.
- Wear safety glasses and gloves to protect yourself from sudden air bursts or sharp parts.
Never skip these steps. Even experienced users can have accidents if they forget safety basics.
Key Parts Of A Pressure Switch
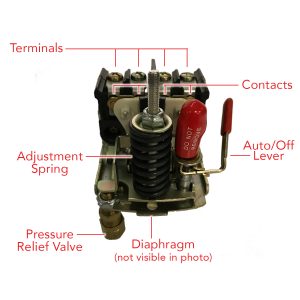
Understanding the main parts of the pressure switch will help you adjust it correctly. Here are the most important components:
- Pressure adjustment screws: Usually two screws, one for cut-in and one for cut-out pressure.
- Spring assemblies: These apply pressure to the switch, changing the activation points.
- Electrical contacts: They open and close to turn the compressor motor on or off.
- Cover: A plastic or metal lid that protects the internal parts.
Not all switches look the same, so check your compressor’s manual for a diagram if you’re unsure.
Tools And Materials You’ll Need
Before starting the adjustment, make sure you have these items ready:
- Flathead or Phillips screwdriver (depending on your switch)
- Air pressure gauge (usually built into the compressor)
- Marker or notepad to record original settings
- Safety glasses and gloves
Having everything nearby will make the process smoother and safer.
Step-by-step Guide: How To Adjust The Pressure Switch
Follow these detailed steps to correctly adjust your air compressor’s pressure switch.
1. Disconnect Power And Release Air
Always start by unplugging the compressor and bleeding off all tank pressure. This prevents electrical shock and accidental air discharge.
2. Remove The Pressure Switch Cover
Most covers can be removed by loosening a few screws. Set the cover aside in a safe place.
3. Identify The Adjustment Screws
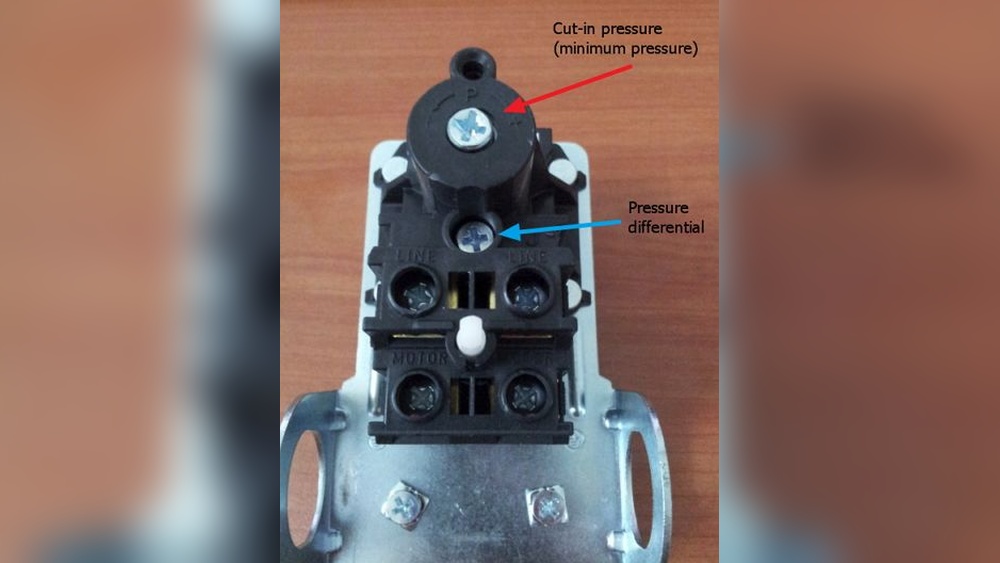
Typically, you’ll find two screws or nuts inside:
- Main (cut-out) screw: Adjusts the maximum pressure before the compressor shuts off.
- Differential (cut-in) screw: Sets the pressure difference between cut-in and cut-out.
Some models use a single screw for both settings. If unsure, consult the user manual.
4. Record The Original Settings
Before making changes, note the current settings. This is important in case you need to return to the original configuration.
5. Adjust The Cut-out Pressure
To raise the maximum pressure:
- Turn the main screw clockwise.
- To lower it, turn counterclockwise.
Make small adjustments—usually a quarter turn at a time.
6. Adjust The Cut-in Pressure
The differential screw changes the pressure gap. Increasing the gap means the compressor starts at a lower pressure, which can reduce cycling but might not suit all tools.
- Turn the differential screw clockwise to increase the gap.
- Counterclockwise to decrease it.
7. Power Up And Test
Replace the cover, plug the compressor back in, and let it run. Watch the pressure gauge:
- Note at what pressure the compressor starts and stops.
- If needed, repeat the adjustment steps for fine-tuning.
8. Repeat Until Satisfied
It may take a few tries to get the perfect settings. Always unplug and release air before each adjustment.
9. Secure Everything
Once satisfied, tighten all screws and replace the cover securely.
Real-world Example: Adjusting For A Nail Gun
Suppose you have a nail gun that works best at 90 PSI, but your compressor stops at 120 PSI and starts at 80 PSI. You might want to adjust the cut-out to 100 PSI and the cut-in to 85 PSI.
This keeps the pressure closer to your tool’s needs, avoids overworking the compressor, and gives you more consistent results.

Credit: mastertoolrepair.com
Common Mistakes And How To Avoid Them
Many beginners make simple errors that can lead to poor performance or even damage. Here are some common mistakes:
- Ignoring safety steps – Always unplug and release air first.
- Large adjustments – Only turn adjustment screws a little at a time.
- Forgetting to record original settings – Always note where you started.
- Over-tightening screws – This can damage the switch.
- Setting pressures too high – This can cause the safety valve to open or damage hoses and tools.
If you avoid these mistakes, your compressor will run better and last longer.
How Pressure Switch Settings Affect Your Compressor
The way you set your pressure switch has a big impact on:
- Compressor lifespan: Running at maximum pressure all the time causes more wear.
- Energy use: Lower settings often mean less electricity used.
- Tool performance: Tools need a steady supply of air at the right pressure.
Here’s a quick comparison of typical pressure switch settings and their effects:
| Setting | Compressor Wear | Tool Performance | Energy Use |
|---|---|---|---|
| High (e.g., 140/120 PSI) | High | Very strong, may damage some tools | High |
| Medium (e.g., 120/100 PSI) | Medium | Ideal for most tools | Medium |
| Low (e.g., 100/80 PSI) | Low | May be too weak for big tools | Low |
Adjust your settings based on what you use your compressor for most often.

Credit: www.youtube.com
Special Considerations For Different Compressor Types
Not all compressors are the same. Adjustments may differ depending on the type:
Portable Compressors
These usually have a simple switch with fewer adjustment options. Only change the settings within the range listed in the manual.
Stationary Compressors
Larger units offer more control and wider adjustment ranges. They often have dual-stage switches for better efficiency.
Oil-free Vs. Oil-lubricated
Oil-free compressors heat up faster, so avoid setting pressures too high. Oil-lubricated models handle higher pressures but need regular maintenance.
When Should You Adjust The Pressure Switch?
You don’t need to adjust the pressure switch every day. Here are some good reasons to do it:
- After changing tools that need different pressure
- If your compressor cycles too often or not enough
- When replacing a faulty switch
- To reduce wear and energy use
If your compressor is working well, it’s best to leave the settings alone.
How To Troubleshoot Pressure Switch Problems
Sometimes, simply adjusting the pressure switch does not solve your problem. Here are some troubleshooting tips:
- Compressor won’t start: Check for blown fuses, tripped breakers, or faulty pressure switches.
- Compressor won’t stop: The switch may be stuck or set too high.
- Pressure readings are off: Test with an external pressure gauge for accuracy.
- Sparks or smells: Stop using the compressor and have it checked by a technician.
If you’re not comfortable with electrical repairs, always call a professional.
Data Table: Common Pressure Ranges For Popular Air Tools
Choosing the right pressure settings depends on the tools you use. Here’s a quick guide:
| Tool Type | Recommended PSI | Pressure Switch Setting (Cut-Out/Cut-In) |
|---|---|---|
| Nail Gun | 70-120 | 100/85 |
| Impact Wrench | 90-100 | 110/90 |
| Paint Sprayer | 40-60 | 65/50 |
| Air Ratchet | 90 | 100/85 |
| Blow Gun | 30-50 | 55/40 |
Always check your tool’s manual for the ideal PSI before adjusting your compressor.
Expert Tips For Better Results
Here are some insights that beginners often miss but can make a big difference:
- Replace worn pressure switches: If the switch doesn’t respond to adjustments, it may be faulty. Swapping it for a new one is safer than forcing old parts.
- Check the safety valve: After making adjustments, test the safety valve to ensure it still opens at the right pressure.
- Don’t push limits: Setting pressures too close to the maximum rating of your compressor or tools can shorten their life or cause dangerous failures.
If you want more technical details, the Wikipedia page on pressure switches offers in-depth information.
Frequently Asked Questions
What Does Cut-in And Cut-out Pressure Mean?
Cut-in pressure is the lower pressure at which the compressor turns on to refill the tank. Cut-out pressure is the higher pressure where it shuts off. Adjusting these controls when your compressor runs.
Can I Adjust The Pressure Switch Without Special Tools?
Most adjustments only need a simple screwdriver. However, always use a pressure gauge to check your results.
Is It Safe To Set My Compressor To The Highest Possible Pressure?
No. Setting the pressure too high can damage your compressor, tools, or hoses, and may even trigger the safety valve. Always stay within the recommended range.
How Often Should I Check Or Adjust My Pressure Switch?
Check your switch if you change tools frequently or notice the compressor cycling strangely. Otherwise, once or twice a year is enough for most home users.
My Compressor Still Runs Poorly After Adjusting The Switch. What Should I Do?
If performance doesn’t improve, the problem may be with the motor, wiring, or a faulty switch. Consult a professional if you’re unsure or if you notice burning smells or sparks.
Making careful adjustments to your air compressor’s pressure switch can help you get the most from your tools and keep your equipment running safely for years. With patience, attention to detail, and a focus on safety, anyone can handle this task like a pro.
Credit: www.rolair.com